
Hey Guys, today we are going to talk about compiling Godot with Mono. Why would we want to compile Godot with mono? Compiling Godot with Mono allows us to use C# within Godot.
Ok great but why do I want to compile it?
Using this method we can create any version of mono or Godot we want with C# support. So if Mono came out with a newer version of C# we could put it into our Godot game before the developers integrate it giving us the new features without waiting. With that being said lets go ahead and get started.
Getting Our Required Software
First we need to download mono. Lets head out to https://www.mono-project.com/download/stable/ and pull down the version we need in my case I want the 64 bit version.
While we are pulling this down lets also get visual studio https://visualstudio.microsoft.com/ Lets pull down the community version.
Now that we have both downloaded lets execute our Visual Studio installer. Its going to ask us what packs we want installed. In my case I’m going to install the unity game dev, C++ dev pack and desktop dev pack. These will allow us to compile Godot.
Next we need to make sure we have Scons and Python Go out to https://www.python.org/ and go ahead and install Python. Once we have that lets open up a command prompt and type
Pip install sconsThis will go ahead and install Scons for you to build Godot.
Building Godot with Mono
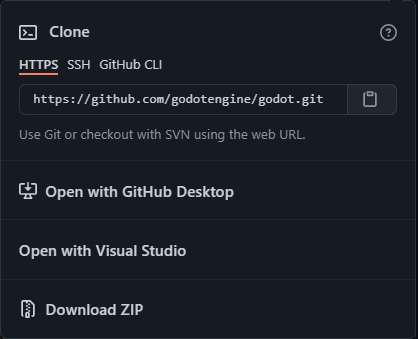
Now we need to get Godots source code. We need to go out to Godots Github. https://github.com/godotengine/godot and go ahead and copy the link for the source code.
Lets open git bash and type git clone
git clone https://github.com/godotengine/godot.gitThis will clone the Godot repo to your machine. Now you need to move over to the proper branch. So cd into your newly created repo and in this case we want to use the 3.3.3 stable release.
git checkout tags/3.3.3-stableThis will switch us over to the new branch and have the proper branch data.
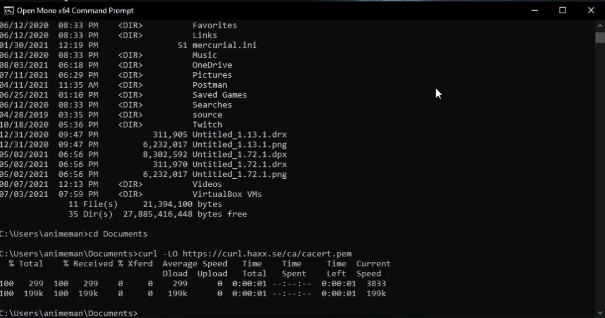
Now open up your start menu and open up your mono x64 command prompt that was installed from Mono. Go ahead and go into a directory that you have permissions to put files in in my case I’m going to go to the documents folder.
Now we need to pull down the cacert file we need to sign our mono compile so we are going to type:
curl -LO https://curl.haxx.se/ca/cacert.pemFinally we need to unpack the cert
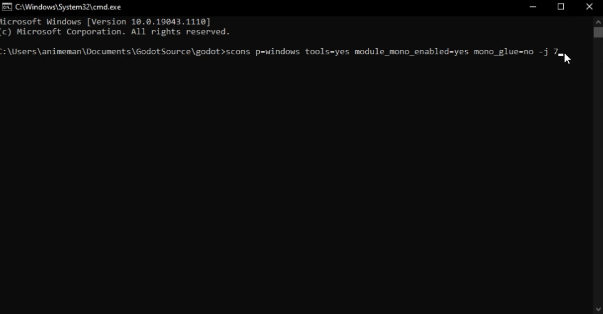
cert-sync --user cacert.pemNow that we have that all sorted lets go ahead and cd into our Godot source code we downloaded and type
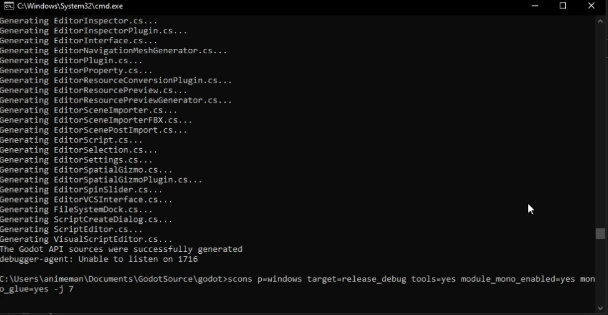
scons p=windows tools=yes module_mono_enabled=yes mono_glue=no -j 7We don’t want to generate glue on our first pass. The reason we don’t is because we need a binary to generate our C# binding from. What does this do?
The first thing is we are calling scons then we are saying we want to compile this for windows. Next we are compiling with the editor so we want the tools, next we are generating with mono so we need to enable it. Last we do not want to generate mono_glue. -j allow us to use our cpu threads 7 means we want to use 7 of our threads.
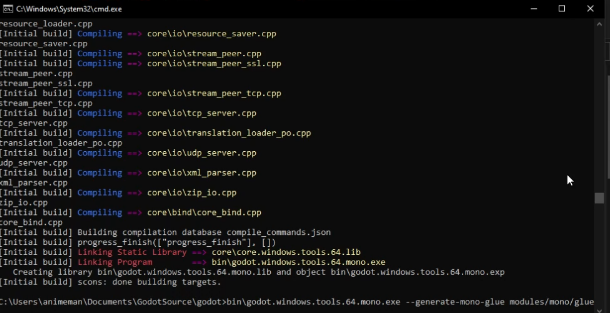
Next we need to generate our bindings so type.
bin\godot.windows.tool.64.mono.exe --generate-mono-glue modules/mono/glueThis will generate our bindings so we can compile with our glue.
Finally lets type
scons p=windows tools=yes module_mono_enabled=yes mono_glue=yes -j 7This will generate our Mono version of Godot!
Using Godot
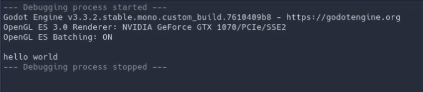
Go into bin and you will see godot.windows.opt.tools.64.mono.exe file. This is your new Godot with your Mono bindings build in! Now open up Godot create a project and create a 2D scene. Lets go ahead and attach a script to your 2D node. Once you do that go ahead and click on build. This will fix your intellasense and create your links in your csproj with Godot.
In your Ready function go ahead and type
public override void _Ready()
{
    GD.Print("Hello World");
}
If we go ahead and hit play you will see hello world printed in the debugger.
Exporting Your Project
Now at this point we need to export our project! So lets go to
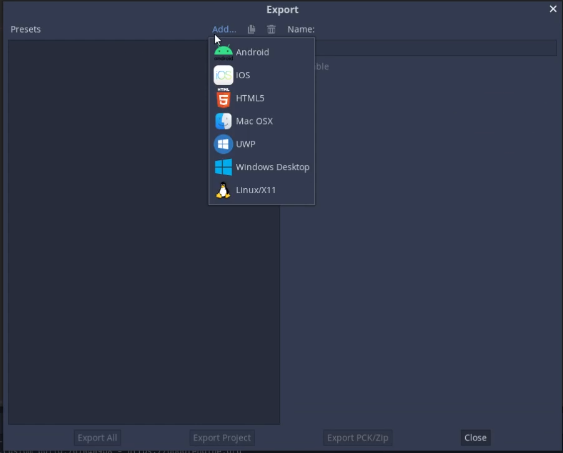
Lets pick Windows. You will see an error at the bottom of the export menu.

This means we need to generate our export template. So lets go back to our command prompt. Lets type
scons p=windows target=release_debug tools=no module_mono_enabled=yes
and
scons p=windows target=release tools=no module_mono_enabled=yes
Both of these commands will generate our windows release and debug exports.
This will place them out in your bin folder.
Go out to your app data folder. and create a folder. In my case its going to be called 3.3.2.stable.mono. This name corresponds with the name of the release of your Godot program. It is found at the bottom of your export menu which has a path to where your export template is located.
Go ahead and copy and paste your bin folder into the created folder. This will link up your export templates with Godot. Now go ahead and export your project.

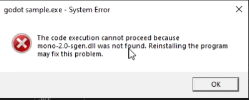
Once you have exported your project try executing it. You will notice its missing a dll file. This is because Godot didnt copy over the missing mono-2.0 file. So go back to your bin folder you will see a mono-2.0-sgen.dll file. Copy that and paste it into your build folder. This will finally allow you to export your game!
Conclusion
It was a bit difficult but we got there! We finally got it to export out using C#! But that’s all I have for you today so if you have any questions hit me up on my discord or leave a comment below and as always thank you so much for reading and ill see you next time.
Thanks,