First we need to download the plugin. Head out to
https://github.com/cagdasc/godot-location-plugin
and click on the green code button and download the zipped code. Lets go ahead and unzip the code.
Compiling the Plugin
Lets open up Android Studio and go ahead and open up the project. If we attempt to build it we will get an unresolved build dependencies. So, to solve this you must download the Godot AAR library for Android plugins.
Once we have that we need to import it into our Android Studio project. To import it lets go to File -> New -> New Module. Scroll down to import Jar/AAR Package. Hit next, Click on the folder icon and navigate to your downloaded package. Hit ok and finish.
From here we need to create our reference to the package. In the project panel lets go down to Gradle scripts and click on build.gradle. Lets add our aar lib to the gradle under implementations. It should look something like this:
dependencies {
    implementation "org.jetbrains.kotlin:kotlin-stdlib:$kotlin_version"
    implementation 'androidx.core:core-ktx:1.3.0'
    implementation project(path: ':godot-lib.3.2.3.stable.release')
    compileOnly fileTree(dir: "aars", include: ["godot-lib*.aar"])
    implementation("com.google.android.gms:play-services-location:17.0.0")

}
Once you have this click on the little hammer icon it would build it out to your build -> outputs -> aar.
Importing the Plugin
Open up Godot and create a scene.
Now that we have a scene lets go ahead and install your android build template. Once you install your android build template. Go ahead and copy your built out aar file and place it into your godot project -> android -> plugins. Once you do this it will be imported into Godot.
Setting the Scene
Lets create a button and put the title of the button to get location. Lets also create 7 RichTextLabels and place them on the screen. Im going to name them as follows:
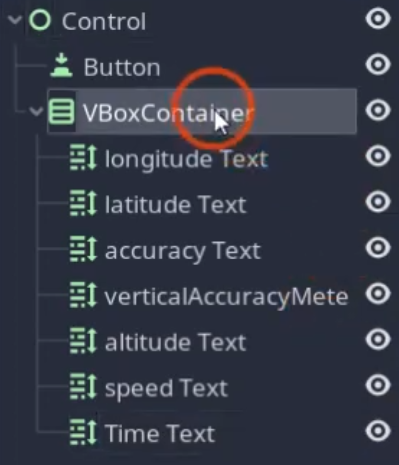
Lets go ahead and duplicate the vboxcontainer and move it over and name them as follows:

Lets go ahead and add a script to our control node (top node in the scene) and name it locationDemo.gd (or whatever you want).
Under our ready lets put the following code.
func _ready():
	get_tree().connect("on_request_permissions_result", self, "result")
	if(OS.request_permissions()):
		result("", true)
	pass # Replace with function body.
Next we need to add our result. This will be ran once the user agrees to have there location tracked.
func result(permission, granted):
	if granted:
		if Engine.has_singleton("LocationPlugin"):
			singleton = Engine.get_singleton("LocationPlugin")
			singleton.connect("onLocationUpdates", self , "gotLocationUpdate")
			singleton.connect("onLastKnownLocation", self , "gotLastKnown")
			singleton.connect("onLocationError", self , "gotError")
			singleton.startLocationUpdates(6000, 10000)
After that lets go ahead and add in our location updates. This will be called whenever we update our location. We will also add in our got last known for out location as well. This will run whenever the location updates manually.
func gotLocationUpdate(locData):
	updateUserInterface(locData)
	pass

func gotLastKnown(locData):
	updateUserInterface(locData)
	pass
Now we need to hook up our error handling:
func gotError(error, message):
	pass
Finally we need to hook up our interface updating:
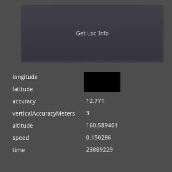
func updateUserInterface(locData):
	$Values/longitudeValue.text = str(locData.longitude)
	$Values/latitudeValue.text = str(locData.latitude)
	$Values/accuracyValue.text = str(locData.accuracy)
	$Values/verticalAccuracyMetersValue.text = str(locData.verticalAccuracyMeters)
	$Values/altitudeValue.text = str(locData.altitude)
	$Values/speedValue.text = str(locData.speed)
	$Values/TimeValue.text = str(locData.time)
Now we need to hook up our button. Lets click on our button and click on signals and lets do a onclick signal and lets connect that to our script. This will generate a function in our script. Lets open that function and add the following.
func _on_Button_button_down():
	singleton.getLastKnowLocation()
	pass # Replace with function body.
Exporting our Project
Lets open up our export menu by going to project > export. Lets add our android export template by pressing add > Android. Lets check custom export and lets be sure to enable our plugin.
Now that we have enabled our plugin we need to be sure to scroll down and turn on access coarse location and access fine location. This will enable our app to access the android subsystem for location access.
Now that we have that lets click export. This will generate an apk file for us to use on our device or if our device is plugged in and developer debugging is enabled on your device you can just click the android icon and it will be exported to your device.
Once you have it installed on your device lets open it.
First thing its going to do is ask for permission to access your location. Lets click while using app and then click the button. This will give us our exact location.
Conclusion
So that’s pretty much all I have for you guys today. Thankfully its simple to get our devices location thanks to this addon. Thank you so much for reading and ill see you next time.
Thanks,